For the overall structure, start with the detective board guide. Use the case board workflow when the evidence spans several leads.
An evidence board is a visual tool for organizing and connecting pieces of evidence in an investigation. Whether you are working a fraud case or a due-diligence review, an evidence board shows how documents, people, events, and facts relate.
What is an Evidence Board?
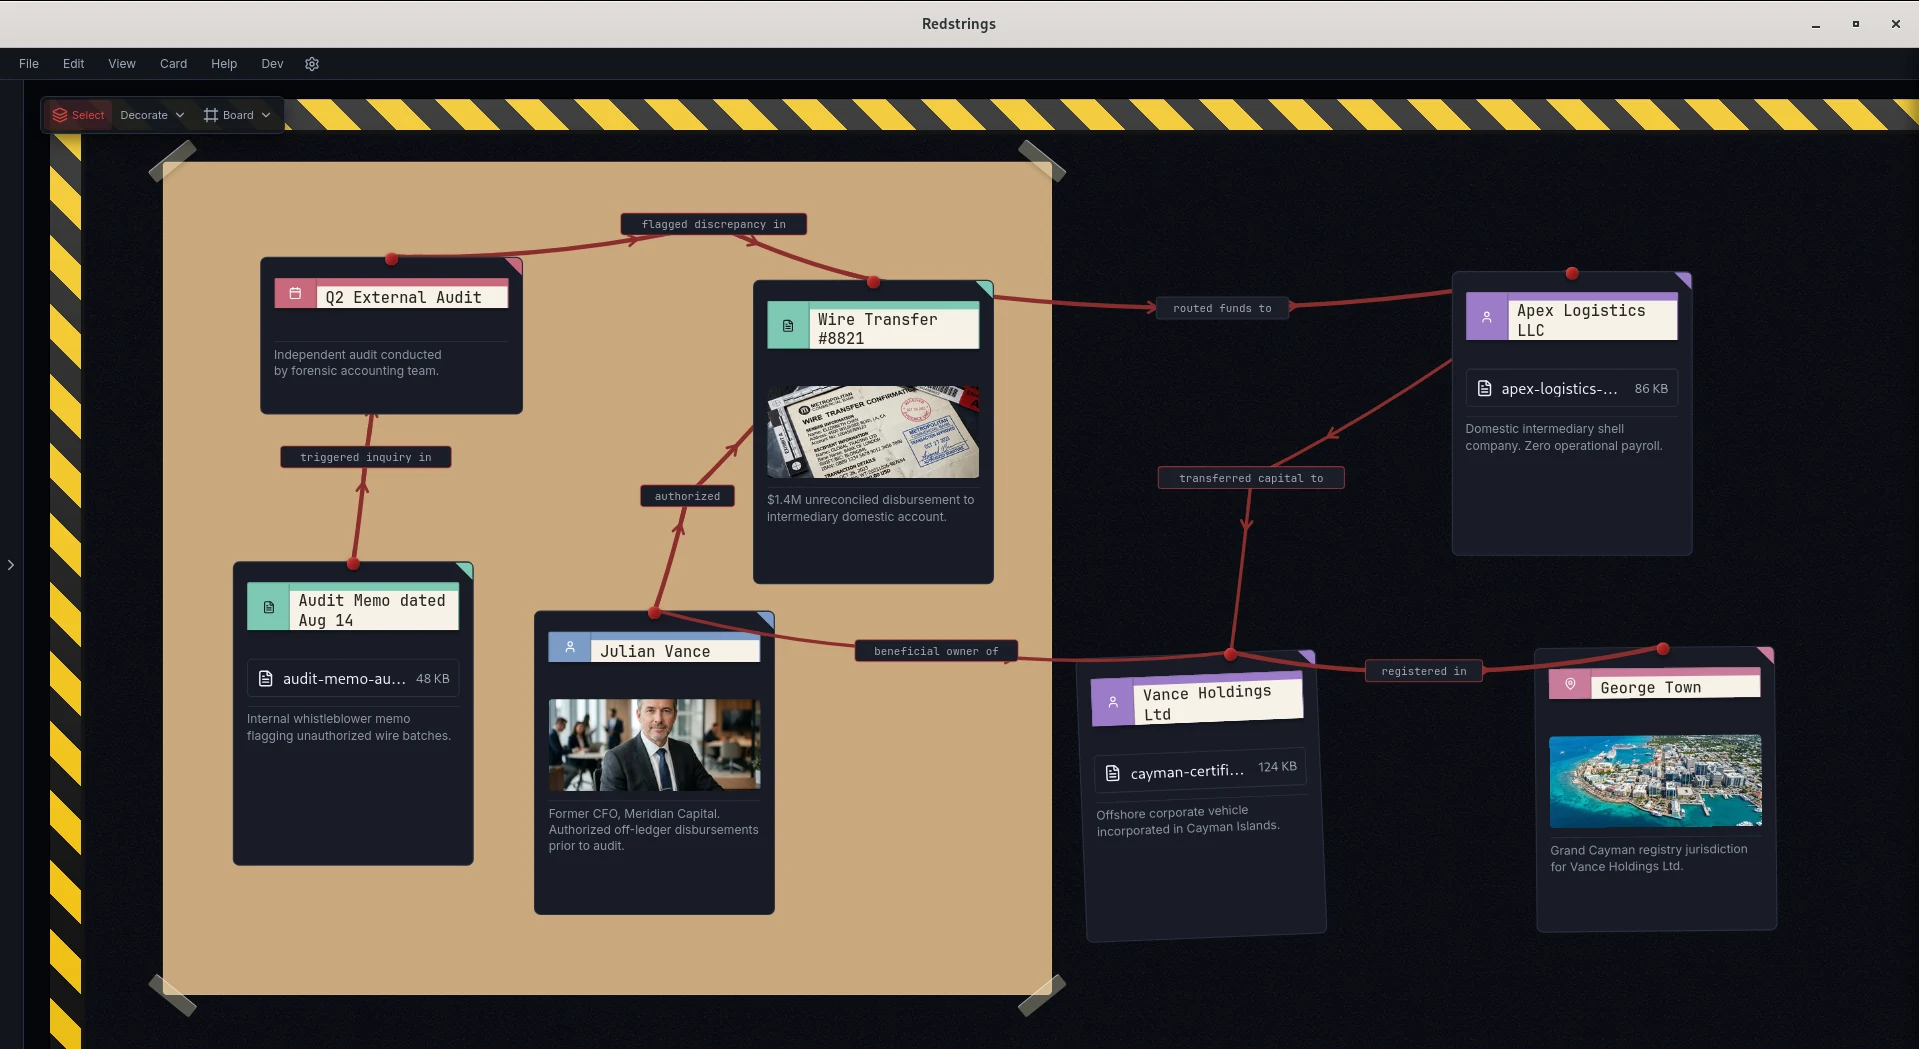
An evidence board (also called a case board or investigation board) displays evidence items visually and shows the connections between them. Traditional evidence boards use corkboards with pinned documents and string connections. Digital evidence boards do the same thing in software. The canvas grows with the board, and you can search it.
Why Use a Digital Evidence Board?
Physical evidence boards have limitations that digital tools solve:
Physical boards fill up. A digital canvas grows as you add cards. You can search the cards and move them without moving pushpins and string.
Digital boards can stay on one machine, behind the login you already have. You can make a backup. You can also export a file or image and hand it to someone.
Evidence Board Templates
Different investigation types call for different board layouts. The four patterns below are starting points you lay out yourself.
Template 1: Timeline-Centered Board
Best for investigations where sequence of events matters.
- Place events chronologically along a horizontal axis
- Connect people and documents to the events they relate to
- Use vertical space to show parallel tracks (e.g., different actors)
- Color-code by evidence type or source
Template 2: Person-Centered Board
Best for investigations focused on relationships between people.
- Place key subjects in the center
- Surround with associates, organized by relationship type
- Connect documents and events to the people involved
- Use connection labels to describe relationships
Template 3: Document-Centered Board
Best for investigations with heavy documentary evidence.
- Group documents by type or source
- Connect documents that reference each other
- Link people to documents they authored or received
- Note key facts extracted from each document
Template 4: Hypothesis Board
Best for investigations testing multiple theories.
- Create separate zones for each hypothesis
- Place supporting evidence near each hypothesis
- Mark contradicting evidence clearly
- Update as evidence confirms or refutes theories
How to Build an Evidence Board
Step 1: Define Your Scope
What question are you trying to answer? What's the boundary of this investigation? A clear scope keeps the board from growing faster than you can read it.
Step 2: Gather Initial Evidence
Collect the documents, names, dates, and facts you already have. Do not worry about organization yet. Get everything into the board first.
Step 3: Categorize Evidence
Assign types to each item:
- Person - Anyone mentioned or involved
- Team - Companies, groups, or agencies
- Artifact - Documents, emails, records, physical evidence
- Process - Workflows or procedures under review
- Event - Anything with a date/time
- Place - Locations relevant to the investigation
- Note - Your observations and questions
Step 4: Draw Connections
Connect items that relate to each other:
- "Person A" authored "Document X"
- "Document X" mentions "Person B"
- "Person A" attended "Meeting on Dec 5"
- "Meeting on Dec 5" occurred at "Location Y"
Step 5: Add Metadata
For each piece of evidence, record:
- Source - Where did this come from?
- Date obtained - When did you get it? Put it in the source or notes field if your tool has no date field.
- Confidence - How reliable is this information?
- Notes - What's significant about this item?
Step 6: Analyze and Reorganize
Step back and look at the board as a whole:
- What clusters do you see?
- Who or what appears most connected?
- Where are the gaps in your evidence?
- What questions remain unanswered?
Reorganize the board to highlight what you've learned. Group related items together. Move central figures to prominent positions.
Evidence Board Best Practices
Label Every Connection
A line between two items isn't enough. Label it: "authored," "witnessed," "contradicts," or "supports."
Track Your Sources
Every fact on your board should trace back to a source. If you can't remember where something came from, its value diminishes.
Mark Confidence Levels
Distinguish between:
- Confirmed - Documentary evidence or direct observation
- Suspected - A single source or a reasonable inference
- Uncertain - Speculation or an unverified claim
Date Everything
When did events happen? When were documents created? When did you obtain each piece of evidence? Dates matter for establishing timelines and credibility.
Keep It Updated
Update the board as you learn new information. Remove items that prove irrelevant. Add new connections as you discover them.
Evidence Board Software
Several tools can serve as digital evidence boards:
- Redstrings - Purpose-built for investigations, with typed cards, labeled strings, and local storage
- Miro/Mural - General whiteboards, flexible but not investigation-focused
- i2 Analyst's Notebook - Enterprise investigation tool, expensive
- Maltego - Link analysis focused, technical learning curve
The requirements that matter for this kind of board are:
- Multiple evidence types (people, documents, events)
- Labeled connections between items
- Search and filter capabilities
- Privacy (local storage, no cloud requirement)
Why Redstrings for Evidence Boards?
Redstrings is built for this kind of board:
- 7 card types - Person, Team, Artifact, Process, Place, Event, Note
- Labeled strings - Each relationship carries a label, notes, and a source
- Confidence levels - Mark strings as Confirmed, Suspected, or Uncertain
- Source tracking - Record where each piece of evidence came from
- Local storage - Boards are files on your machine. Nothing is sent anywhere unless you turn on AI analysis with your own Gemini key.
- Multiple boards - Organize complex cases into separate views
Download Redstrings free and start building your evidence board.